If I had a nickel for every time someone asked me, “What sort of wizardry is this?” I’d be a rich man. Although the Soft Chew Wiggler story is a relatively short one, it’s evolved over six years and has gone through many revisions: from a solid full body, to a segmented flexible body, to eventually just a head section. After the pattern was finalized to just the head section, I added glass beads as a ballast to keep the fly from lying on its side and to slow its ascent between strips, allowing it to suspend in the water column. The glass beads also produce a chattering effect when the fly wobbles. As I learned more about angling, I became a great observer, and I started to look at things three-dimensionally. As you may know, fish don’t always hunt by sight and smell alone. They can also use their lateral line to feel movement and changes in pressure. So, the synapse in my brain finally made the connection and the light bulb lit. I decided this design was going to be less about a matching the hatch and more about giving off the vibration and sound of a baitfish in distress and running for its life.

When it comes to flies, I’ve always had an innovative attitude that I believe is due to my occupational background. As an AutoCad draftsman for the better part of 20 years, I’ve been able to use my everyday computer skills at home on my hobbies. When I sleep, I guess you could say that I’m haunted by fish-shaped foam.
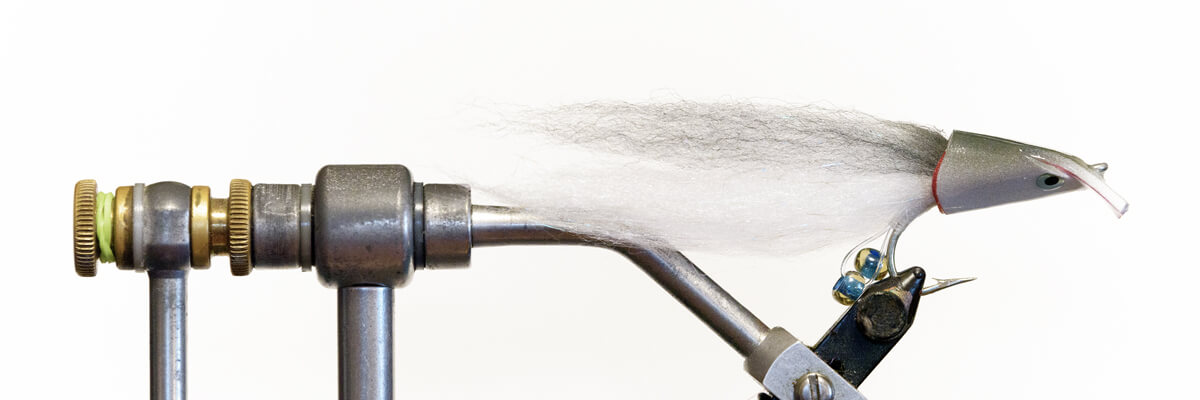
Materials
- Hook: Mustad 3407DT O’Shaughnessy (or equivalent), Size 2/0
- Thread: Danville 210 Denier Flat Waxed Nylon
- Head: 2mm Craft Foam Sheet (craft store or fly shop)
- Adhesive: Super Glue
- Loops: 20- to 30-pound monofilament or fluorocarbon, 12 inches
- Beads: Glass Beads – 3/16” to 1/4” diameter (Typical for 2) (craft store)
- Body: Letera’s 4” Magnum Dubbing by American Tied Flies (or equivalent)
- Eyes: Prism, self-adhesive, 3/16” to 1/4” diameter
- Body Art: Paint Markers, Airbrush, etc.
- Finish Coat: Flex Seal Liquid (Clear) or UV Flex Epoxy
 Step 1
Starting at the hook eye, wrap a base of thread toward the bend a little less than half way. Wrap thread back to the eye before beginning step 2.
 Step 2
Fold a 12-inch length of mono or fluoro in half, leaving a loop at one end. With the loop end, starting behind the hook eye, use the thread to tie in the mono, keeping both 6-inch lengths side by side on the top of the shank and down the bend, matching the wraps from step 1.
 Step 3
Starting with the bobbin hanging near the hook point, place one glass bead on either tag end of the mono. Keeping both tag ends as even as possible, roll the mono forward, creating bead loops. Make about six wraps and adjust the length of the mono loops before continuing to tie in the remainder of the mono.
 Step 4
Cut the remaining tag ends of mono behind the hook eye and wrap in completely. When completed, the loops should still be loose enough to allow the beads some freedom of movement.
 Step 5
Starting with the bobbin hanging just ahead of the hook bend, tie in the first layer of body hair (belly color). Leave approximately 3 inches of hair extending beyond the bend. Finish wrapping any remaining hair along the hook shank.
 Step 6
Matching the start point and length of the first layer, tie in second layer of body hair (back color). This time, pull the forward portion of remaining hair backward to be used as filler. When pulling the hair back, be sure to add a few wraps ahead of the hair to lock it in. Whip finish and prepare the foam head using the provided pattern.
 Step 7
Once you have the foam head cut out and pre-glued into a tubular shape, rotate the fly 180 degrees and take a moment to test fit the foam head and see how you would like it to sit. Once satisfied with where the head will be positioned, put the head aside and add a few dabs of Super Glue along the bottom of the hook shank. Using a bodkin or toothpick, spread the glue evenly along the bottom and sides of the shank.
 Step 8
Once the glue is spread evenly along the thread, slide the foam head over the hook, being careful not to let the foam touch the glue until it’s in the correct position. Let the glue set to the foam for about 15 seconds.
 Step 9
Flip the fly right-side up. If you have not already done so, use a bodkin and poke a hole in the foam lip where it will be pushed over the hook eye. The hole should be approximately 5/16 of an inch up from the end of the lip. Carefully stretch the foam down and over the eye.
 Step 10
Add prism eyes and any other body art, if desired. I’ve found both paint markers and airbrush paints hold up well when using a finish coat.
 Step 11
Put a finish coat on the entire surface of the foam head. I prefer Flex Seal clear liquid, but it requires 4 to 6 hours of drying time. Use UV Flex Epoxy for faster drying times.

To learn more about Carl Harris’ innovative fly patterns,
you can visit his Online Store, Instagram, or Facebook pages
 SUBSCRIBE TO TAIL FLY FISHING MAGAZINE